
The concept
The Open Graph Protocol enables any web page to become a rich object in a social graph. For instance, this is used on Facebook to allow any web page to have the same functionality as any other object on Facebook. - https://ogp.me
Dealing with title, type, URL or locale properties is straightforward. You will render them in your template. However, generating dynamic images could look quite challenging. In reality, it could be easier than you think!
If you decide to integrate the image metadata on a static pre-rendered site, you will have different choices:
- Use the same image for all of your links.
- Manually create and upload custom images per URL and fall back to a default one when missing.
- Create on-demand image files using a web server and a browser automation tool.
Creating on-demand images with automation will take two steps:
- Create a route that renders the image as HTML. We can pass the data as query or route parameters.
- Once we are happy with the style of our page, we will crawl it and get a screenshot with a
Node JSscript. We will only include our target element, being pixel-perfect.
Create a route on Svelte Kit for previewing the image.
We will start with a blank layout. If your page is already using one, you can create a blank one at the root of the routes folder.
<!-- routes/layout-blank.svelte --> <slot />
Then you will create the actual index for your page. Either: ogImage@blank.svelte or ogImage/index@blank.svelte.
In our .svelte file:
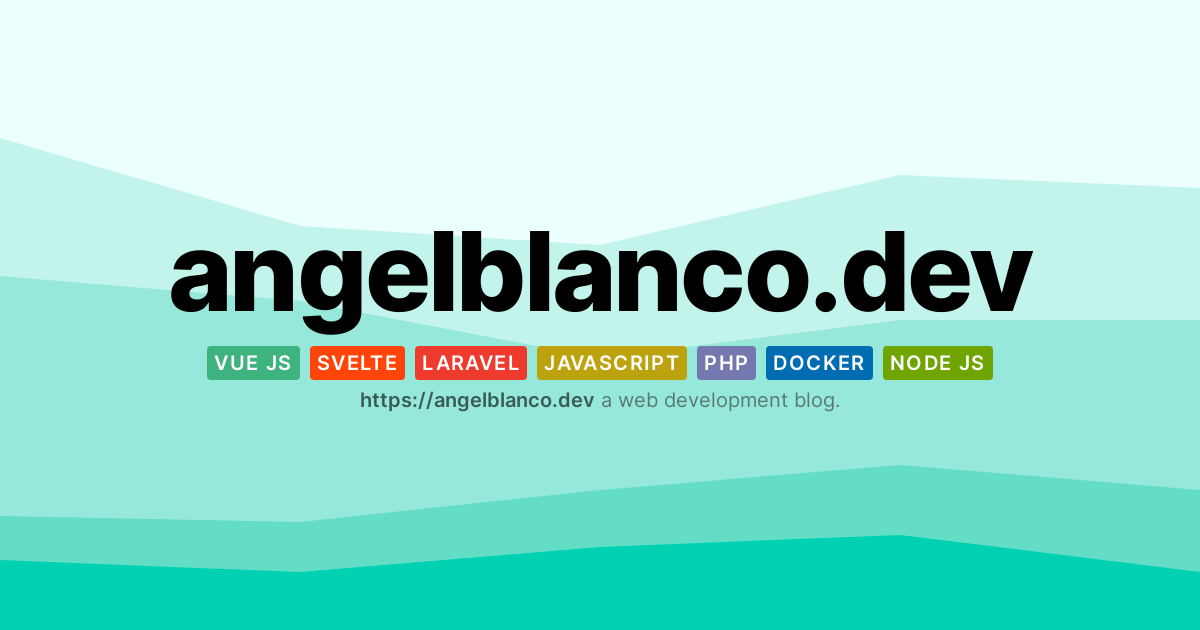
- The title is a query parameter.
- The title's font size varies with the title length.
- Our target image will live inside a
1200pxx630pxcontainer. This size comes from various great posts like this one.
To create the SVG patterns, I've used Haikei!. I can't recommend it enough. PD: Don't forget to set the canvas size to 1200px x 630px!
<!-- routes/ogImage/index@blank.svelte || outes/ogImage@blank.svelte --> <script context="module"> // Disable prerender for this page as query parameters change the content of it at execution time export const prerender = false; </script> <script> import { page } from '$app/stores'; import pattern from '../../assets/ogPattern.svg'; // Override this variables with your own const refLink = 'https://angelblanco.dev'; const phrase = 'a web development blog.'; const defaultTitle = 'angelblanco.dev'; $: title = $page.url.searchParams.get('title') || defaultTitle; // Depending on the actual size of the text we will use different font-sizes. let titleClass = ''; $: { const titleSize = title.length; if (titleSize <= 10) { titleClass = 'og__title--2xl'; } else if (titleSize <= 30) { titleClass = 'og__title--xl'; } else { titleClass = ''; } } </script> <div class="og__outer-wrapper"> <div class="og__box"> <div class="og__image" style="background-image: url('{pattern}')"> <div class="og__title {titleClass}"> {title} </div> <div class="og__ref"> <span class="og__ref-link"> {refLink} </span> {phrase} </div> </div> </div> </div> <style> @import url('https://fonts.googleapis.com/css2?family=Inter:wght@100;200;300;400;500;600;700;800;900&display=swap'); .og__outer-wrapper { display: flex; justify-content: center; align-items: center; width: 100%; padding: 40px; min-height: 100vh; background-color: #fdfdfd; font-family: 'Inter', sans-serif; color: #000; } .og__box { border: 1px dashed #ccc; padding: 5px; } /* The container to be captured as image */ .og__image { position: relative; display: flex; flex-direction: column; align-items: center; justify-content: center; width: 1200px; height: 630px; overflow: hidden; padding-top: 5%; padding-bottom: 5%; padding-left: 20%; padding-right: 20%; } .og__title { font-size: 75px; letter-spacing: -0.025em; font-weight: 800; line-height: 1; text-align: center; margin-bottom: 20px; } .og__title--2xl { font-size: 140px; } .og__title--xl { font-size: 110px; } .og__ref-link { font-weight: 600; color: #000; font-size: 20px; } .og__ref { font-size: 20px; font-weight: 400; color: #333; opacity: 0.6; } </style>
Create the Playwright's script.
First of all, you need to install the libraries. We need Playwright Library and wait-on.
yarn add --dev playwright wait-on
Note we are installing "Playwright Library" to automate a browser from a Node JS script. I recommend you to try "Playwright Test" too. It's perfect for adding end-to-end tests to any of your current applications!
Now we need to create our NodeJs script. Assuming we are going to place it at the root of our project. We will:
- Build our
Svelte Kitapplication for production and preview it on a given port. With thewait-onlibrary, we ensure that the server is ready before crawling starts. - Open a
chromiuminstance with Playwright and navigate to the URL of our recently created page. - Once we are there, we will locate the target element and save it to a file as
.png!
import waitOn from 'wait-on'; import { exec } from 'child_process'; import { chromium } from 'playwright'; const options = { protocol: 'http', host: '127.0.0.1', port: 5001, timeout: 300000, }; const url = `${options.protocol}://${options.host}:${options.port}/ogImage`; let server; const main = async () => { console.log('Building sveltekit...'); server = exec( `yarn build && yarn preview --port ${options.port}`, (error) => { if (error) { console.error(error); console.error('Error building application!'); process.exit(1); } } ); const [, browser] = await Promise.all([ waitOn({ resources: [url], timeout: options.timeout, }), chromium.launch(), ]); console.log('Start generating og images...'); const page = await browser.newPage(); await page.goto(url); await page .locator('.og__image') .screenshot({ path: 'static/ogGenerate.png' }); await browser.close(); }; // Run the generator. main() .then(() => { console.log('Og images generated successfully'); if (server) { server.kill(9); } process.exit(0); }) .catch((err) => { console.error(err); if (server) { server.kill(9); } process.exit(1); });
Finally, you can run it with node.
node createOpenGraphImage.js
With a for loop, we will have all the screenshots we want.
const entries = [ { text: 'Hello world', file: 'hello-world.png' }, { text: 'Svelte is cool', file: 'svelte-is-cool.png' }, ]; for (let entry of entries) { const query = new URLSearchParams(); query.append('title', entry.title); await page.goto(`${url}?${query}`); await page.locator('.og__image').screenshot({ path: `static/${entry.file}` }); }
Once you have understood this process, you can take many screenshots as you wish. For example, you can use a glob library to get all the markdown files inside a folder. However, sometimes it might be simpler to use a crawler and traverse all the links within your app.
What's next?
After this introduction, you can go deeper with some of these ideas:
- Integrate this process into your CI system at PR. This way, you will never forget to create an image.
- Generate images for each of your links. Crawl them recursively with Playwright and request them on demand.
- Customize the look and feel of the image. You can use tags, swap the SVG pattern, change the font, etc.
- On your dynamic site, you can create a small
NodeJsserver. There you will generate the images just in time. After generation, you will persist them. If the file already exists, your reverse proxy or CDN will serve that file for you.
Now you are ready to uninstall Photoshop and style everything with CSS 😎